0.前言
XWPFTable是在word中操作表格的一个类。操作中遇到了在word中操作表格的功能,但是实际操作中遇到了一些问题,比如,生成的表格没有边框,合并单元格不生效等。
本文以及后面的文章都简单介绍XWPFTable的操作。
springboot:2.7
poi-ooxml:5.2.3导入依赖,我打开poi官网:https://poi.apache.org/download.html
我们找到最新maven依赖,然后导入:
 <!-- 操作word-->
        <dependency>
            <groupId>org.apache.poi</groupId>
            <artifactId>poi-ooxml</artifactId>
            <version>5.2.3</version>
        </dependency>
1.创建表格
我们通过createTable方法在word中创建表格。
参考代码如下:
 void testXWPFTable(){
        System.out.println("开始执行");
        try {
            //定义word
            XWPFDocument doc = new XWPFDocument();
            //在word中创建一个表格
            XWPFTable table = doc.createTable();
            //表格中添加数据
            XWPFTableRow row = table.getRow(0);  //下标从0开始
            row.getCell(0).setText("A1");
            row.addNewTableCell().setText("B1");
            row.addNewTableCell().setText("C1");
            //导出
            String path = "C:\\";  //文件路径
            String name = "test";  //文件名
            path = path + "/" + name + ".docx";
            File file = new File(path);
            if (!file.exists()) {
                file.createNewFile();
            }
            FileOutputStream out = new FileOutputStream(file);
            doc.write(out);
        }catch (IOException  e){
            e.printStackTrace();
        }
    }
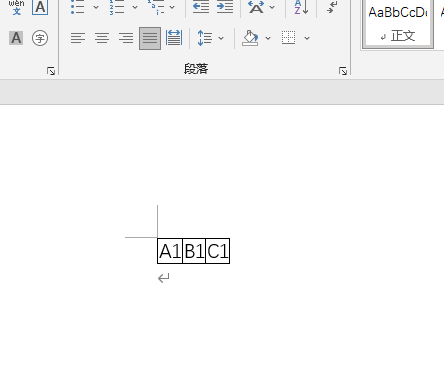
因为我们在代码中导出的位置是C盘根目录,所以我们找到位置打开word,就可以看到下面的内容了。

2.读取word中的表格
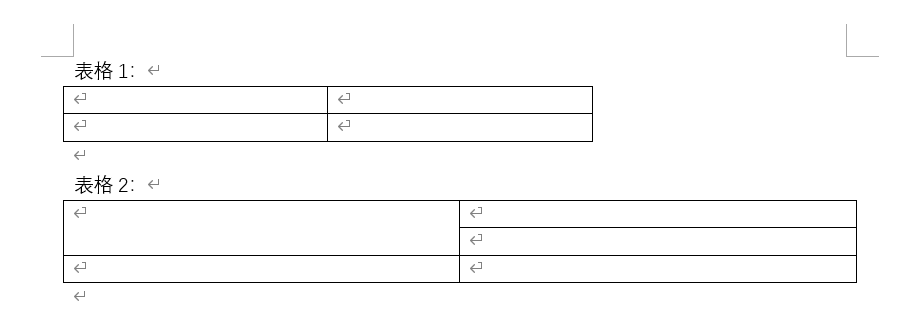
我们在word中定义了两个表格如下:

然后修改代码如下:
void testXWPFTable2(){
        System.out.println("开始执行");
        try {
            InputStream is = new FileInputStream("C:\\test.docx");
            //定义word
            XWPFDocument doc = new XWPFDocument(is);
            //获取word中所有的表格
            List<XWPFTable> tableList  = doc.getTables();

            XWPFTable table1 = tableList.get(0);  //表格中第一个表
            XWPFTable table2 = tableList.get(1);  //表格中第二个表
            //修改表1的值
            table1.getRow(0).getCell(0).setText("A1");
            table1.getRow(0).getCell(1).setText("B1");
            table1.getRow(1).getCell(0).setText("A2");
            table1.getRow(1).getCell(1).setText("B2");
            //修改表2的值
            table2.getRow(0).getCell(0).setText("A1");
            table2.getRow(0).getCell(1).setText("B1");
            table2.getRow(1).getCell(1).setText("B2");
            table2.getRow(2).getCell(0).setText("A3");
            table2.getRow(2).getCell(1).setText("B3");
            //导出
            String path = "C:\\";  //文件路径
            String name = "test2";  //文件名
            path = path + "/" + name + ".docx";
            File file = new File(path);
            if (!file.exists()) {
                file.createNewFile();
            }
            FileOutputStream out = new FileOutputStream(file);
            doc.write(out);
        }catch (IOException  e){
            e.printStackTrace();
        }
    }
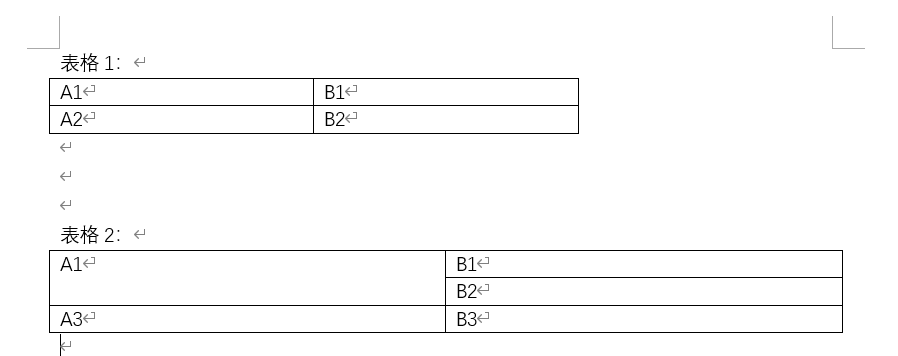
执行后导出效果如下:
